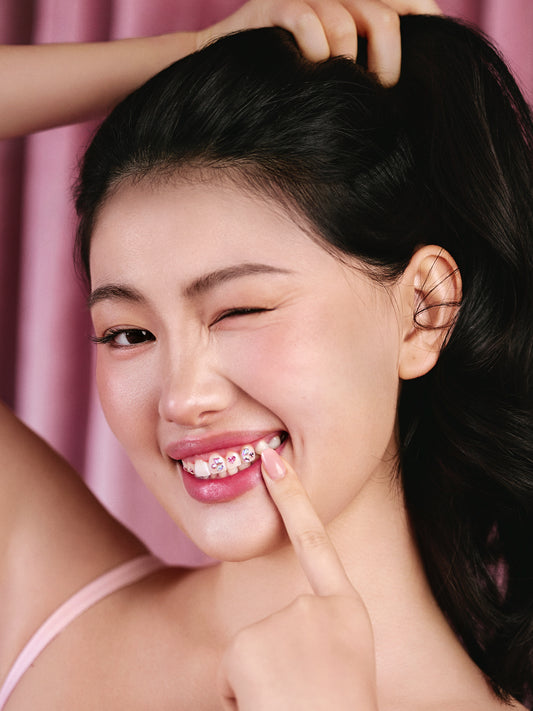
How to get Tooth Gems to Clear Aligners
Toothgems are having a moment! These tiny gems are the ultimate blend of creativity and self-expression without breaking the bank. But if you're wearing clear aligners, you might’ve hit a snag. Can you still rock it without messing up your treatment? Absolutely. Here’s how to apply tooth gems to your aligners like a pro (and why they might not be sticking the way you hoped).
Why Your Tooth Gems Keep Falling Off Aligners
You’ve followed all the instructions, secured your gem, and admired your handiwork in the mirror. But then… plop! The gem falls off within minutes, leaving you wondering where you went wrong. Trust me, it’s not you! Here are the most common reasons why this happens:
1. Aligner Material Isn’t Gem-Friendly
Most clear aligners are made from smooth, flexible plastic. While this is perfect for straightening your teeth, it’s a slippery opponent for adhesives. Toothgems need a solid, slightly rougher surface to form a good bond.
2. You Might Be Rushing the Bonding
If the adhesive doesn’t cure properly, the gem won’t hold. Slow down and give it time to set.
3. Everyday Flexing
Your aligners flex every time you remove or adjust them. Over time, this weakens the gem’s bond.
How to Put Tooth Gems on Your Clear Aligners: Step-by-Step
Ready to create a statement smile? Here’s your step-by-step guide to applying tooth gems on aligners with better, longer-lasting results:
Step 1: Start with a Clean Slate
Use mild soap and a soft brush to clean your aligner. Rinse and dry completely with a lint-free cloth.
Step 2: Lightly Scuff the Surface
Optional, but effective! Gently buff the gem area with fine-grit sandpaper or a nail buffer for extra hold. This creates more texture for the adhesive to grip onto. Don’t overdo it though—we’re going for a slight roughness, not a deep groove.
Step 3: Plan Your Placement
This part is where your creativity shines! 💎 Use a toothpick or tweezers to pick up your gem and play around with placement. Whether you’re going for a single statement sparkler or a constellation of gems, map it out before you commit.
Step 4: Apply Dental-Grade Adhesive
Place a tiny dab on the prepped spot. Don’t overdo it—less is more.
Step 5: Press and Hold
Use tweezers or your finger to press the gem into place for 30–60 seconds. This is your glam meditation moment.
Step 6: Cure the Adhesive
If your kit has a UV light, cure the adhesive for about 1–2 minutes. This step seals the deal—literally.
Step 7: Test the Bond
Tap gently. If it’s wobbly, reapply and cure again. Once it feels solid, pop your aligners in and flaunt that smile!
The One Step You Should Not Follow: Etching
If you’ve read other DIY guides, you might have seen suggestions to etch the surface of your aligner. But here’s the deal: skip it.
Etching, which involves applying an acidic solution to create a rough surface, is used on natural tooth to create a porous surface for the dental adhesive to grip on. But it is a big NO for clear aligners. The acids in etching gels can weaken the plastic, causing unwanted discoloration, warping, or damage. Stick with gentle scuffing instead for a safer alternative, it does the same thing !
And there you go! Skip etching and trust me, your aligner (and wallet) will thank you.
Final Sparkle: Show Off Your Gem Style
Tooth gems on clear aligners are more than a fashion statement—they’re a form of self-expression. With the right prep, patience, and care (plus skipping that etching step!), you can safely bedazzle your aligners without worry.
We’d love to see your gemmed-out creations!
And since gems on retainers or clear aligners are going to be more temporary anyway, it’s totally okay to experiment with more affordable gems by other brands! Our STARRA Toothgem DIY Kit is a lil pricier because lead is an essential ingredient to make crystal gems shine so we only use real Swarovski and other European crystal brand’s premium line that are lead-free (make sense since tooth gems stay in your mouth 24/7 💎💖)
BUT we still recommend for adhesive only using nontoxic adhesives or resins even for short-term wear. For example , craft glues like e6000 or b7000 that are popular on TikTok can be super toxic and even making people sick from just inhaling too much while crafting 🥺😬